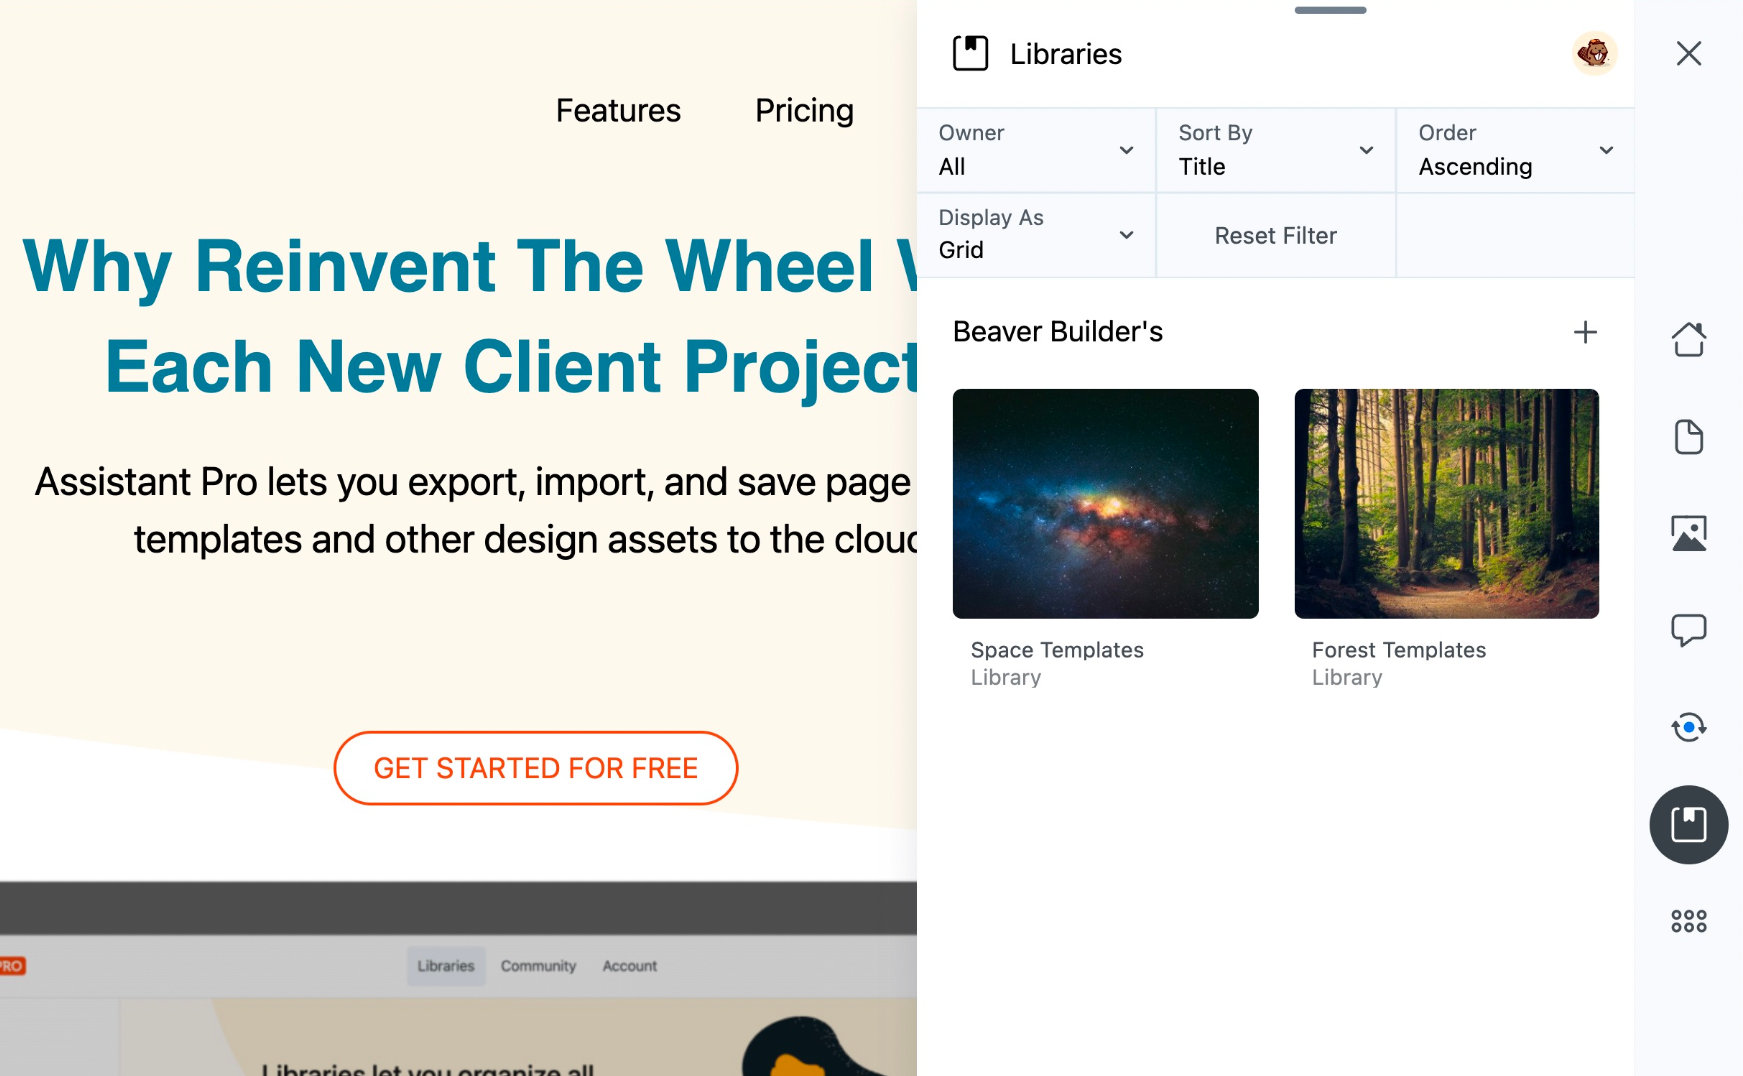
Libraries App
The Libraries App allows you to connect your WordPress site to Assistant Pro Cloud. Once it's connected, you can create, manage and add content to libraries, launch the Assistant Pro Cloud and disconnect from Assistant Pro Cloud.
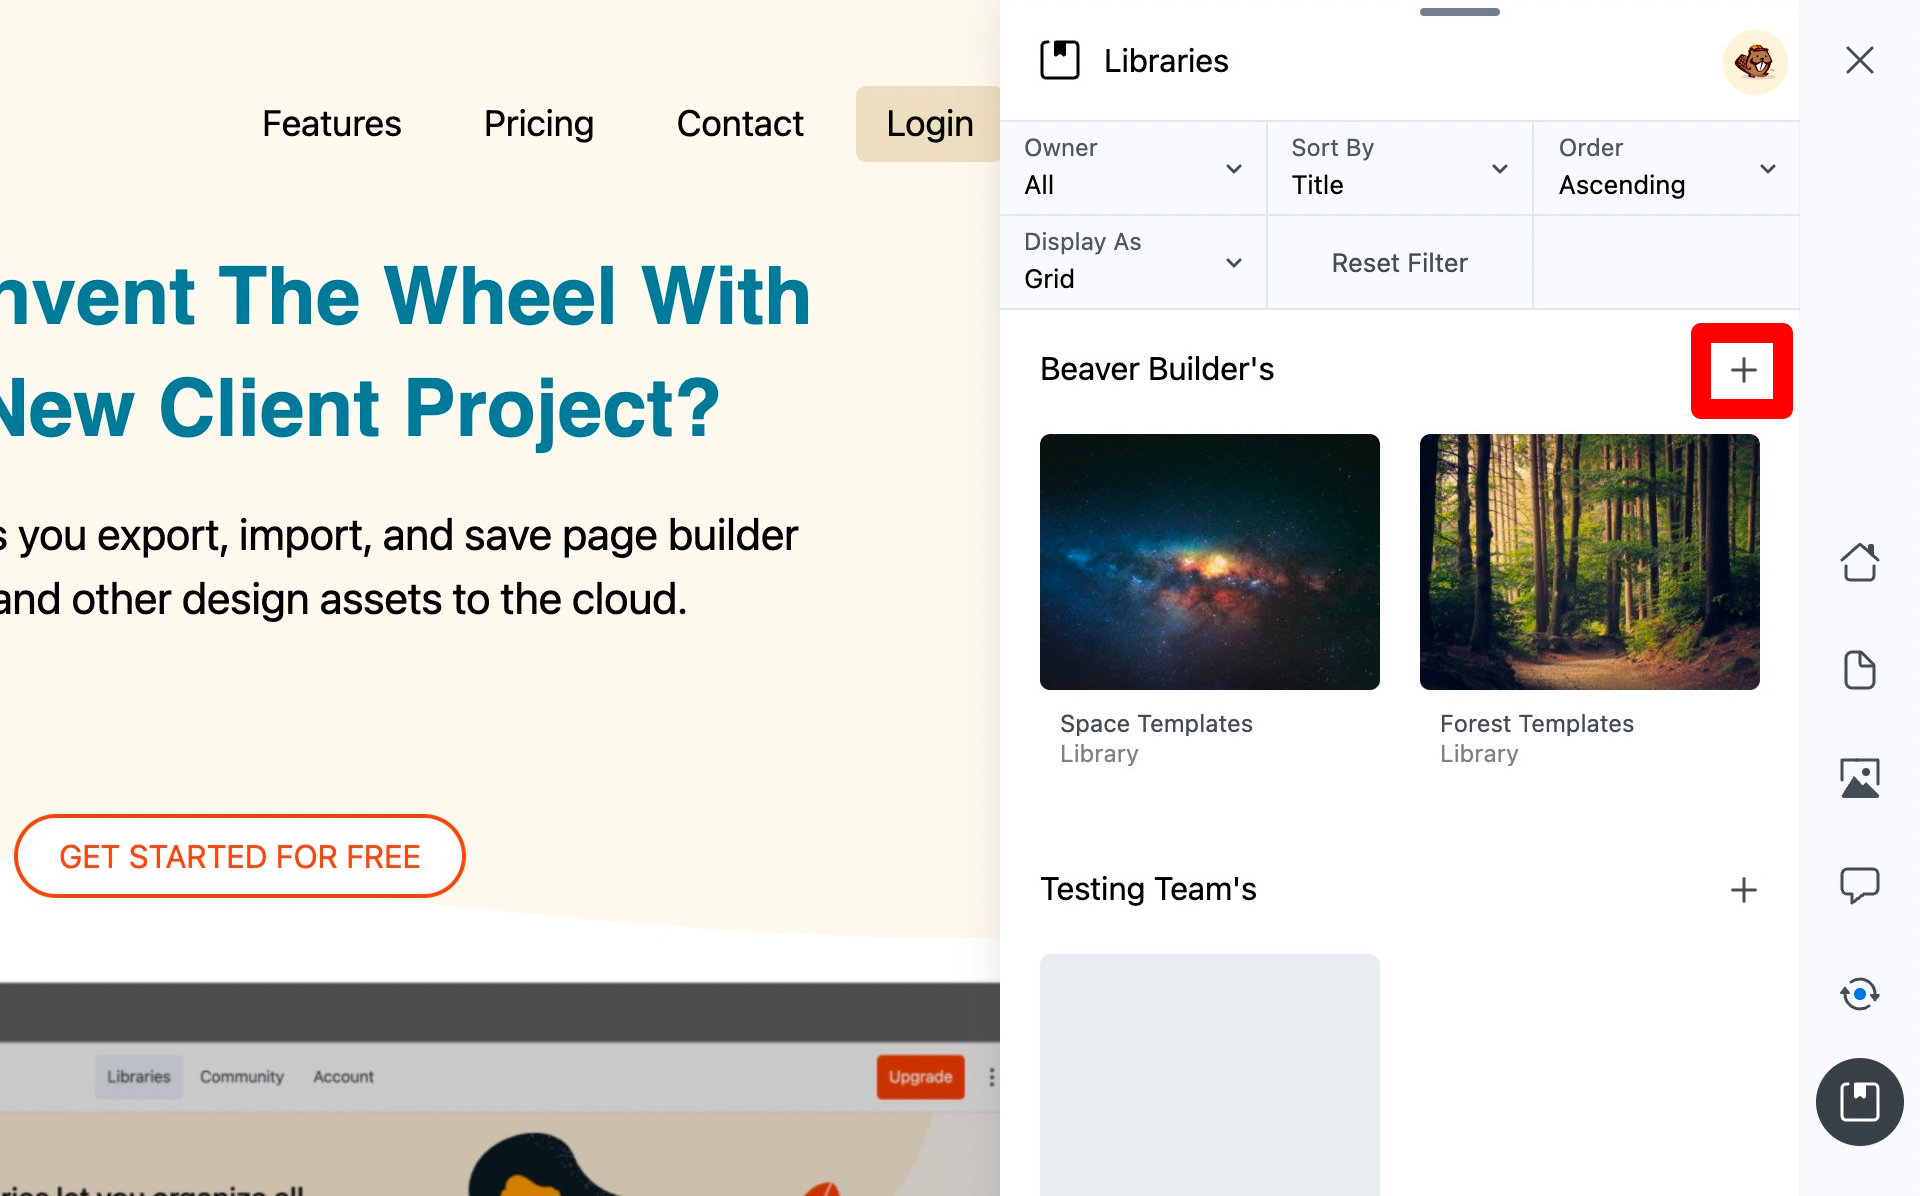
Create a Library
To create a new library from the Assistant Plugin:
- Open the Libraries App.
- Click the Plus (+) icon.
- Enter a name for your library.
- Click the Enter button or hit Enter / Return on your keyboard.
Please note that free users can create one library. Existing free accounts will retain access to any libraries they currently have, but if they have more than one, they won’t be able to create additional libraries. To access unlimited libraries, upgrading to a Personal or Team plan is required. Premium users can also make their libraries private by clicking the lock icon or adjusting the privacy settings within the library.
Add Items to Libraries
Libraries let you save and reuse common assets across your sites, making it faster to build pages and keep everything consistent. You can add Content, Media, Colors, Code, and Settings to your libraries directly from the Assistant plugin.
Content
Use the Content tab to select WordPress posts, pages, or custom post types and add them to your libraries.
- Select the library you want to add items to.
- Click the (+) icon in the top-right corner.
- Open the Content tab and choose the content you want to add.
You can add all items from a specific post type, or use search to find a particular page, post, or custom post type item and add it to the library.
Once you’ve selected your content item(s), click Add, and the content will be added to your library.
Media
Media libraries allow you to add images and videos directly to the WordPress Media Library.
- Select the library you want to add items to.
- Click Add New and choose Media.
- Upload new files or select existing images or videos.
- Review your selection.
- Click Save.
All media items are stored in your WordPress Media Library and can be reused anywhere on your site.
Add Colors
Colors let you save named color values to your libraries for consistent branding and design.
- Select the library you want to add items to.
- Click the Plus (+) icon and select Colors.
- Select your color from the color picker or enter numeric values to select a color.
- Name your color (by default the name will be the color’s hex code).
Code
Code libraries are perfect for storing reusable snippets such as PHP, CSS, or other code.
- Select the library you want to add items to.
- Click Add New and choose Code.
- Enter a name for your snippet.
- Paste your code into the editor.
- Select the file extension (for example, .php or .css).
- Add additional snippets if required.
- Click Save.
Each snippet is stored with its name and extension for easy reference later.
Settings
Settings libraries let you save configuration options from WordPress and Beaver Builder for reuse or migration. You can store WordPress Customizer settings from your theme, Beaver Builder Admin Settings, Global Settings, Global Styles, and Global Colors.
- Select the library you want to add items to.
- Click Add New and select Settings.
- Choose the source of the settings:
- WordPress Customizer (Theme Settings)
- All Beaver Builder Settings
- Beaver Builder Admin Settings
- Beaver Builder Global Settings
- Beaver Builder Global Styles
- Beaver Builder Global Colors
- Select the specific settings you want to save.
- Click Add Settings.
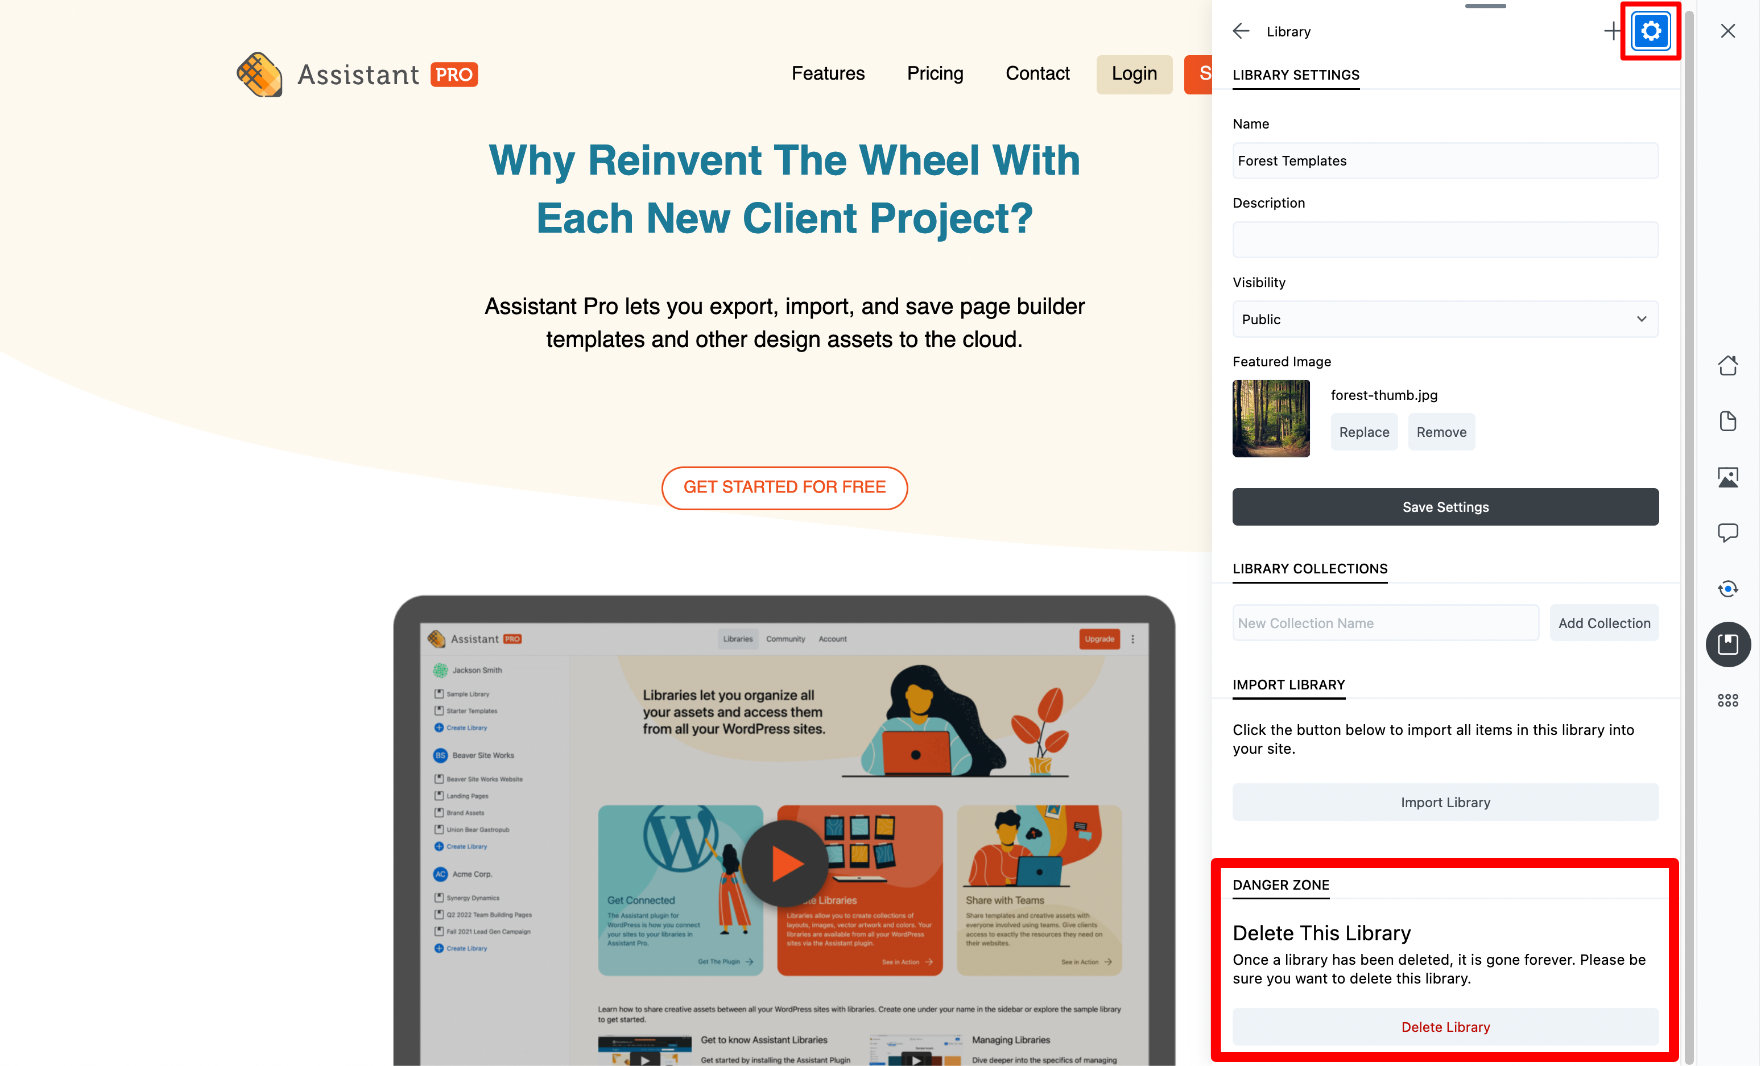
Edit a Library
To edit a library from the Assistant Plugin:
- Open the Libraries App.
- Navigate to the library you want to edit.
- Click the Settings button (cog icon).
From here, you can perform the following actions:
- Name - Edit the library name.
- Description - Give the library a description.
- Visibility - Set the visibility of the library, chose between Public and Private.
- Featured Image - You can assign an image to the library which will be used for the Assistant's user interface (UI).
- Library Collections
- Import Library
- Delete Library
Delete a Library
To delete a library from the Libraries App:
- Open the Libraries App.
- Select the library you want to delete.
- Click the Settings icon.
- Scroll down to the Danger Zone section.
- Click the Delete Library button in the Delete this library section.
- Confirm the deletion.
Import Library Content
You can import your library into your website using two different methods, depending on whether you want to bring everything across at once or select specific items.
When applying settings, such as WordPress Customizer settings from your theme or Beaver Builder settings, these will overwrite any existing theme or Beaver Builder settings. Be sure to back up your current settings before applying them.
When importing code snippets, only CSS and JavaScript can be imported directly into the Assistant Code app. If your library includes snippets written in other languages, such as HTML or PHP, you’ll need to manually add them to your page or post.
- Click the code snippet item in your library.
- Open the Code Editor tab.
- Copy the code snippet.
- Paste the code into your page or post where needed.
Bulk Import
The Bulk Import option lets you import multiple items at once. When you choose this method, you’ll be prompted to select which specific items you’d like to import.
- Select the library you want to import.
- Click the Cog icon in the top-right corner.
- Under the Actions section, click Import Library.
- Use the dropdown menu to choose which items you’d like to import in bulk.
You can choose from the following options to bulk import specific items.
- All Items, imports every item in the library to your website.
- All Content, imports all content items in the library, including posts, pages, and custom post types. This also allows you to include:
- Beaver Builder content
- Posts
- Pages
- All Settings, imports all saved settings, including:
- Beaver Builder settings
- Theme settings
- Images, imports all images stored in the library.
This method is ideal when you want to quickly restore or migrate an entire library, or large portions of it, in one step.
Select Multiple Items
- Click the Select button to open the Select toolbar.
- Choose the library items you’d like to work with by clicking each item. You can select multiple items at once.
- Once your items are selected, use the toolbar actions to either:
- Import the selected items to your website, or
- Delete the selected items from the library.
- Confirm your action when prompted.
This method is ideal when you need to import or remove several items at the same time, giving you full control over what gets added to your website or cleaned up from your library.
Import Individual Items
You can import individual items from your library. To do this, follow the steps below.
Click directly on the library item you want to import, such as a post, color, or code snippet.
Click the Import Action button.
Choose one of the following options:
Create New, imports the library item and creates a new page or post in the WordPress Admin Dashboard.
Replace Current Page/Post, imports the library item directly into the page or post you’re currently editing, replacing its existing content.
cautionThis action replaces all content in the posts.
This lets you import that specific item immediately, without needing to enter Select mode. This approach is perfect for quickly importing a single item on demand.
Download Zip
The Download Zip option lets you download an entire library as a single ZIP file. When selected, every item in the library is exported into its own individual file, making it easy to back up, share, or move your library between websites.
Inside the ZIP file, items are organized by type:
- Colors added through the Colors tab are stored in a
colors.jsonfile. - WordPress content, such as posts and pages, is exported in
.xmlformat. - Images are included as individual files, using their original file extensions.
- Code snippets are saved using the file extension you selected when creating them, for example, CSS snippets use
.cssand PHP snippets use.php.
This option is ideal for creating backups or transferring your entire library to another site while preserving each item in its original format.
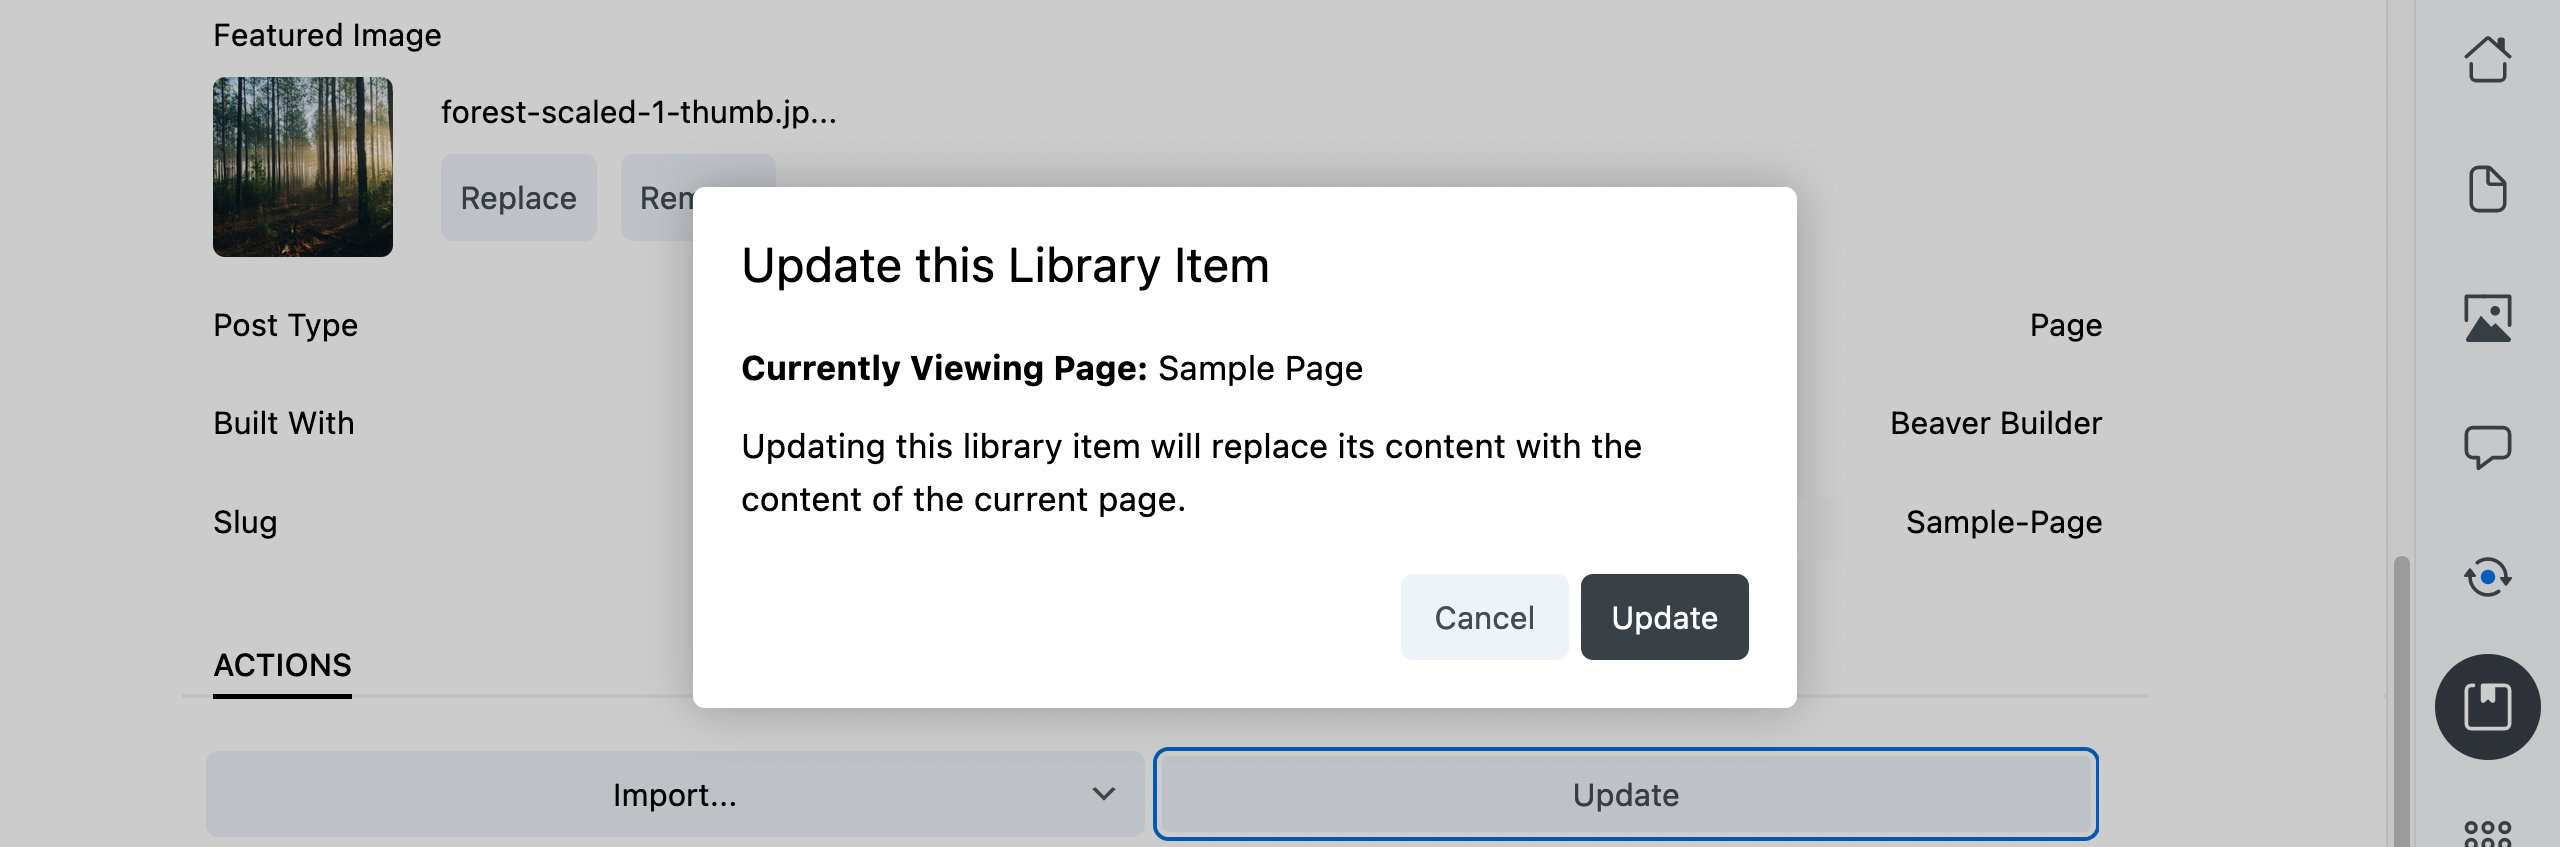
Update
The Update action allows you to update the library item with the content from the current page or post.
Assistant Pro does not store revisions in the cloud, so this action cannot be reversed.
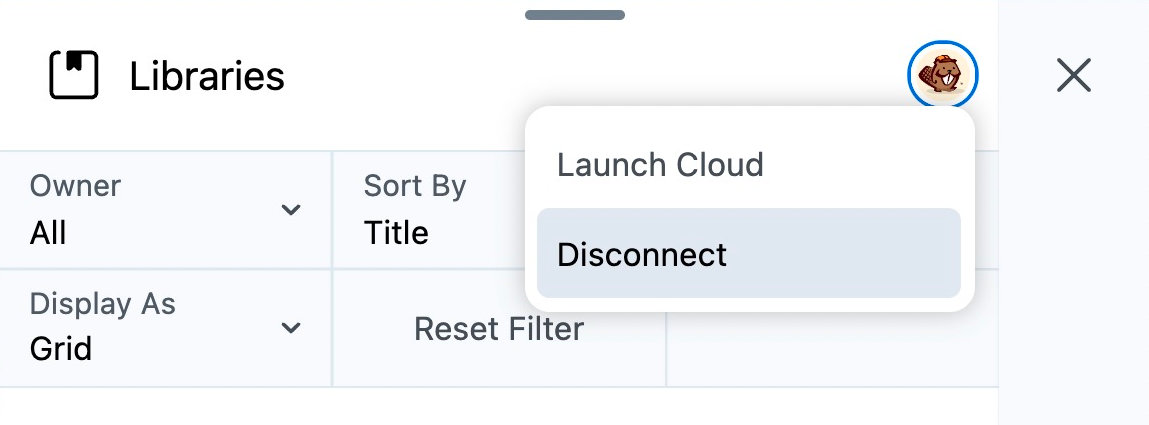
Launch Assistant Pro Cloud
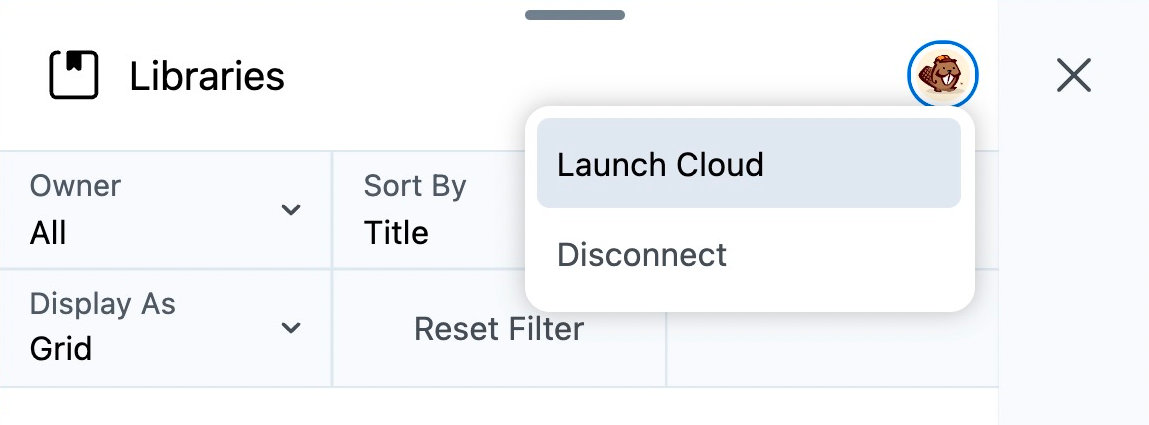
You can quickly launch Assistant Pro Cloud in a browser from within Assistant plugin's Libraries App.
To launch Assistant Pro Cloud from the Libraries App:
- Open the Libraries App.
- Click your avatar in the upper right corner.
- Select Launch Cloud.
Using the Launch Cloud option is only possible after you have connected the Assistant plugin.
Disconnect from Assistant Pro Cloud
The Assistant Pro Cloud can be disconnected from within the Libraries App. To disconnect your WordPress site from an Assistant Pro Cloud account:
- Open the Libraries App
- Click your avatar to deploy a dropdown menu
- Select Disconnect
If you are disconnected from the Assistant Pro cloud, the Library App will be unable to access libraries, and you will need to reconnect for libraries to display.